Philips Sonicare Repair - mechanical issue
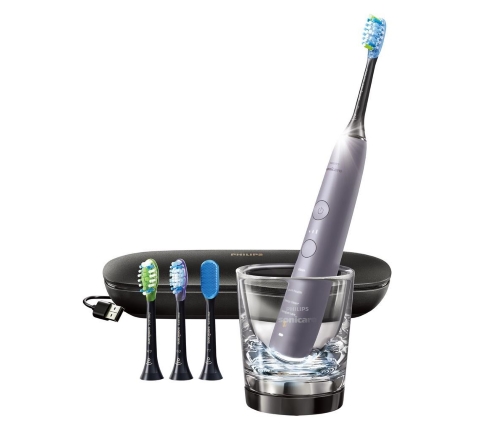
One might assume I cause problems for myself in regards to my electronic toothbrush if you’re reading this and have read Philips Sonicare Repair - electronic issue. I’ll refrain from making judgments and explain what recently happened with my fairly new Philips Sonicare DiamondClean Smart 9500.
Late 2021 at a dental clinic, lying down and looking up at my hygienist, Lori, I realized unsurprisingly more effort was required on her part to clean my teeth in comparison to when I used my Sonicare. The fact is, I wasn’t using any electronic toothbrush, just manual cleaning for several months. In the small area surrounding me was typical dental equipment and in the corner displayed a box of Philips Sonicare. We started to talk about it and I mentioned my previous one broke after I repaired it. Here in the United States, there are several things in life I don’t understand and one of them is the relationship between dental clinics and insurance companies. Specifically how the 2 parties settle on what is covered for the patient and the negotiating that goes on in between. The side-effect of this negotiating is a bill from the dental clinic stating the amount owed which seems to be followed by another bill on how much you now don’t owe. My point here, Lori checked my account and I had a few hundred dollars of credit in my account. Apparently dental clinics bank on payments from insurance companies after negotiating. So she handed me a new Philips Sonicare deducted from my dental credit that I just realized I had!
The Mechanical Issue
After happily using this newer generation of Sonicare, I noticed an excessive rattling noise that when being used propagated throughout my mouth into my jaw. It wasn’t painful, it was still operable, but just annoying to experience. It only happened when pressure was applied to the left side of the shaft and when pressure was applied to the front. Reluctant to undertake another Sonicare repair, and after a couple of months of using it with this issue, I eventually committed myself in attempts to repair or call support for a replacement since it was still under warranty. Thankfully, with the experience of my last Sonicare repair, this wasn’t difficult at all.
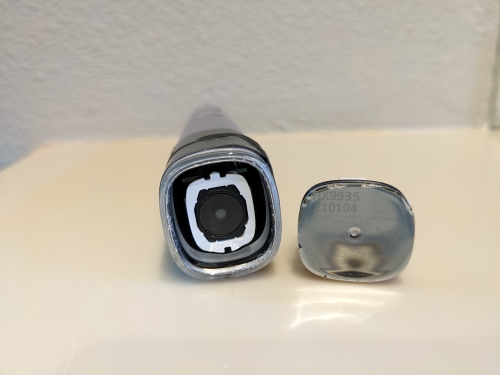
Remove cap
Squeezing the end of the handle’s body where the cap is located, I noticed this cap is similar to the previous generation although its appearance is different. It’s best to squeeze height-wise or when viewing this picture top-bottom axis:
I taped the body with electric tape to protect it from the Channellock (slip-joint plier) tool that I used to do the squeezing. If this is done, hopefully, a gap will form between the inner cap and its surrounding. Using a probe, such as a flat-end screwdriver to prey the inner cap out should be fairly easy. Be gentle with whatever tool is used, since there is an o-ring on the inner cap.
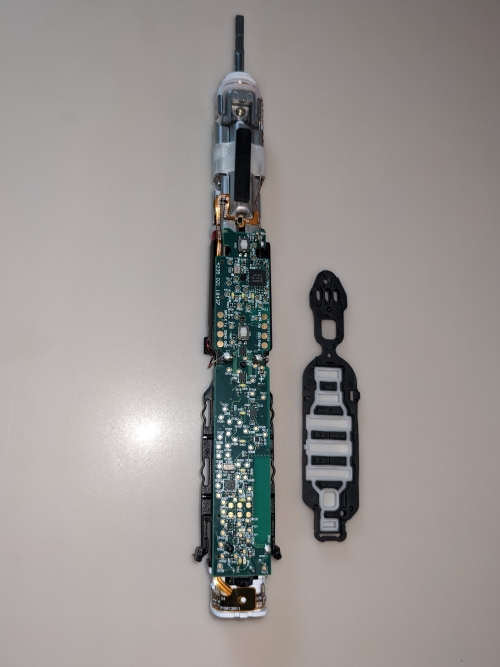
Remove inner body
Notice in the image below, towards the bottom end, the black plastic tabs (“dog ear”) on either side. These cleat into the inside of the handle. Knowing about these is important when attempting to slip the inner body out since that’s the only thing holding it in place. Other than some small amount of friction inside. So those can be pushed inwards while slipping perhaps thin hard plastic to prevent them from cleating to the handle. I used a small flat end screwdriver to push on a black plastic tab while I inserted a toothpick to prevent it from cleating. Although this did work, it does require patience since visibility is poor due to the small amount of space to work in.
The Cause
After glancing at the inner body it’s similar but different from the generation I previously owned. By removing the black rubber (TPE) sitting on the circuit board, I noticed the circuit board is quite different with several test points. I also noticed one of the conductors to power the electric motor looked out of place so I just pushed it with my thumb into a better position. Inspecting it for any dislodged or fractured metal cast part, I didn’t notice anything after 15 minutes or so. So I pushed the inner body back into the handle and powered it on to realize I fixed it!
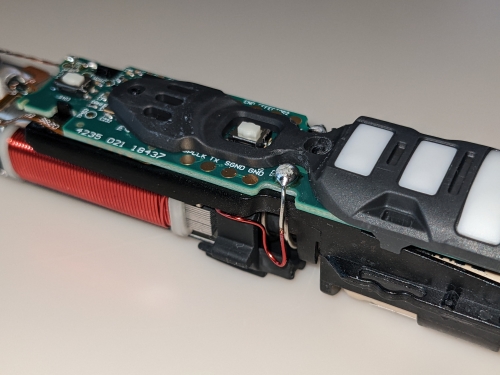
So the cause, to my conclusion was the red shiny metallic conductor that is soldered on top of the circuit board to the electric motor. This is seen centered in the image below. It was simply extending outwards and apparently vibrating against the handle when pressure is applied to the shaft mentioned above.
This does explain my observations only when I experienced this issue. And I assume these conductors have not been soldered to the circuit board by automation, but manually by a person due to the size of the solder joint and that it connects 2 different (electric and mechanical) parts of the device together.
For anyone interested, this is the original battery:
Conclusions
This was indeed an easy fix. But it was only easy due to my previous experience. At least more so. The satisfaction of fixing the issue mentioned here has been great but would’ve not occurred if it wasn’t for my patience and curiosity.
I hope this post helps anyone having an issue with this device. And this device in my opinion is superb in quality despite my issue here and previously mentioned, which only occurred after using it for over 2 years. So I’m not here to discredit Philips or anyone associated with this product but to bring awareness to any users interested. I hope, in my ideal world, that products like these in the near future will be designed for users can repair them when needed, especially when the battery fails which eventually it will. Because its a shame to have products discarded for repairable issues.


